Check out the winners of the CG CHALLENGE XXII by CGSOCIETY, themed Steampunk (you know I like steampunk, right?), Video & Image category.
VIDEO
Team Entry Video – Master Award ‘EMET’
Bonsaininja Studio ITALY
Artist comments: “Our piece was inspired by the legend of the Golem, telling the story of Rabbi Loew, who created an animated being entirely from inanimate matter to defend the Prague ghetto and we decided to produce a trailer out of it for the CGChallenge.”
Judge’s comments:
Anthony Lucas: Epic. Masterful technical achievement.
Simon Dominic: I feel like I just stepped out of the cinema.
Philip Straub: Outfreakinstanding!
Michael Dashow: The composting and editing were really impressive. Lovely opening shot!
Launch the video : ‘EMET’ VIDEO page
Team Entry Video Excellence Award ‘Atlantis – Inconvenient Truth’
Martin Koehler (arcaneg), Christian Stadach (cmdrpi), Simon Prager (SimonDarmstadt) and Christopher Hempel (Xr4t3d) GERMANY
Artist comments: ‘Working on the project was quite hard, because actually none of us had enough time for it. But we took the time besides our other projects, because this was lots of fun and really worth it. The idea and story changed many times. To get the project ready in time we worked day and night in the last week, and really: “day and night”.’
Judge’s comments
Anthony Lucas: Some great design. Good idea. Where the animation is patchy the concept makes up for it.
Simon Dominic: Wow, this is slick, with a brilliantly conceived theme too.
Philip Straub: Extremely professional on every level. Top marks from me.
Michael Dashow: Beautiful rendering, design, and camerawork.
Launch the video: ‘Atlantis – Inconvenient Truth’ VIDEO
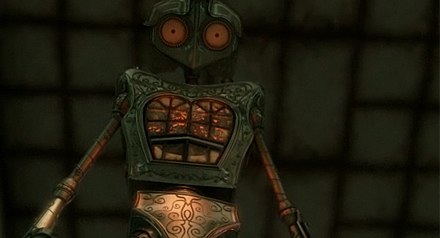
Individual Video Master Award ‘Hemlock’ Tyson Ibele (ivanisavich)
NEW ZEALAND
Artist comments: This year’s contest was a lot of fun, especially since the competition was very close due to the large number of high-quality entries. I felt very inspired the whole way through watching other peoples’ progress, and that’s what kept me driven to finish my entry on time. This challenge theme allowed for a lot of creativity, and since I’ve wanted to do a film set in the steampunk universe for a while now, it was a perfect motivator. Thanks to everyone who offered me encouragement and critique during the production of Hemlock, and congrats to the other winners and entrants!
Judge’s comments
Anthony Lucas: Great execution. Fantastic mood. Is the steampunk robot a victim of the well? Marvellously animated.
Simon Dominic: What a great story with superb delivery.
Michael Dashow: What a great mood set throughout the entire piece. The lighting, camera-work, and sound were wonderfully effective, and the ending was terrific. Easily the most thoroughly-executed story of the bunch. Great work overall!
Grzegorz Jonkajtys: Great storytelling and directing skills, not to mention excellent lighting and animation.
Launch the video: ‘Hemlock’ VIDEO
Individual Video Excellence Award ‘Ulysses’ Dreams’
Marc Mordelet (visionmaster2)
 FRANCE
Artists comments: “I had a great fun testing some shots I had in mind, and this challenge gave me the opportunity to question myself about my work process. Especially after I submitted my video, when i saw the works of the other people (especially Tyson Ibele), and after a long discussion with a friend, this evidence came to me : I need to step up to the next level, and make a short movie.”
Judges comments:
Anthony Lucas: Fantastic concept, modeling and lighting. Great design and animation. Great stuff!
Simon Dominic: Completely mental, I LOVE it!
Philip Straub: A unique, bizarre, and creative vision.
Michael Dashow: I loved the clever use of fonts in the robot’s body – very stylish (as was the rest of this film.)
Launch the video: ‘Ulysses’ Dreams’ VIDEO
IMAGES
Image (Individual) Master Award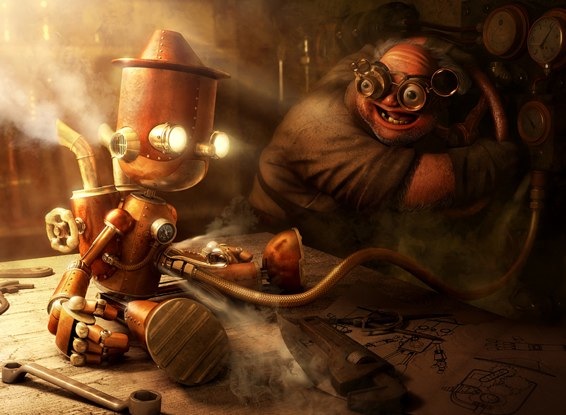 ‘Steamnocchio’
Fabricio Moraes (fabmoraes)
BRAZIL
Artist comments: “WOOOOOOW!!! I CAN’T BELIEVE IT!!!! I felt so great and could never imagine I could possibly win this competition, actually I still can’t believe it. I got inspired by so many great artists, and I was very well supported by my wife, family and friends. I am very excited, really!Sorry if words are missing, but is so difficult to describe how great I am feeling now.”
Judge’s comments:
Brajan: I love this one, the expression on Geppettos’s face is priceless 🙂 Excellent steampunk image!
Leigh: This image just totally nails the steampunk theme. The technical quality is simply fantastic too.
Image Excellence Award ‘BaktoFairy’
‘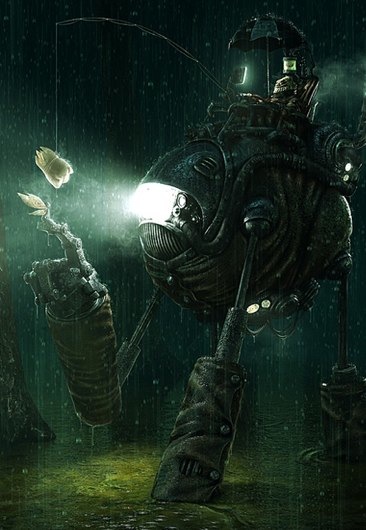
Laurent Pierlot (sato)
USA
Artist comments: “It is a great honor for me to get the Excellence prize, especially considering the quality of the works that have been submitted for the contest.When I saw that the subject for the contest was Steampunk, I just couldn’t help myself. I really appreciated the feedbacks I got in the WIP forum.It was really hard for me to finish that picture, I’m working full time so it was only possible with the patience of my family on the weekends and late nights.”
Judge’s comments:
Brajan: this image looks great even as as a thumbnail. Excellent design for a creepy steampunk setting!
Oh, and check out the special category winners too!
[From CGSociety News Archive]


 Last
Last FriendFeed
 Twitter
 StumbleUpon
 Facebook
 Digg
Digg Delicious
 Youtube